Pages

Thursday, 29 November 2012

Sensory nativity story box

How to make a nativity story box.

I love story boxes and story sacks, they are great for helping children concentrate on and  interact with the story. I also love the play opportunities playing with the prompts provides after reading the story. Making a Christmas story sack is a great way to engage your child with the nativity story.


In our nativity story box we had blue blanket (for the expectant mother), a green tea towel (compulsory head gear for Joseph)

Tinsel (or garland for those in the US) for an angel and a left over crown (from the Jubilee celebrations) - which seemed very fitting for a wise man. We also had and a shiny star to mark for the men to follow.

The presents from the wise men added a sensory element myrrh and frankincense were represented by spices (as they are smelly)- cinnamon sticks and ground spice. For gold we used chocolate (later replaced by some gold coins after we had eaten them).


A toy lamb represented a shepherd.

And most importantly baby Jesus was our doll wrapped in one of the Frog's old muslins. The Fairy decided the empty box made a perfect crib.

As I told the Christmas story I took the relevant prop out of the box and we took turns either wearing it or playing with it.

After the story was finished I removed the non safe elements and let the children play with the story. The Fairy retold the story whilst the Frog (who is currently very into hats) had great fun experimenting with which hat he liked best and finding the most tasty prop.

We played follow the star ( a version of hide and seek). The Fairy and I took turns to take the star and hold it some where in the room. The other person then found it.

The Fairy wanted to make sure we knew what was in the box so the next day we decorated a piece of card with star prints to use as the back ground for a label.

Language Links:
Vocabulary: Names (Jesus, Mary, Joseph, King , Angel etc), baby, star, sheep. lamb, shiny, smell, find
Other skills: concentration, re telling a story (narrative)

This week some other fab bloggers are getting together to share their nativity ideas. Why not check them out


or add your own ideas too our linky:


Thursday, 15 November 2012

How to make 3 easy handmade christmas tree decorations

Making handmade Christmas tree decorations with the kids is a great way to get into the Christmas spirit. Homemade decorations are a fun way to create memories through shared experience and get creative at the same time.

Before I had kids I was a bit of Christmas decoration snob - I like things to be coordinated and tasteful (although I've always been rather fond of sparkle and a bit of bling- but instigated in a coordinated fashion!) Post kids we've gone for the riotous look. Fantastically making you own decorations doesn't have to be hard. Check out 3 of our ideas below, which can be easily be tailored to your taste/ colour scheme.


Everyone needs a bit of sparkle. How about this simple pipe cleaner heart. The Fairy twisted the ends of the pipe cleaners together (under my watchful eye). Then I helped to bend them round to form a heart shape. Ta da, in less than a minute you have a heart.


If you regularly read our blog you'll know were fans of dough/ clay in all its forms. Salt dough and clay make great modelling materials for kids. The Fairy made this heart. I helped her make the hole (using a straw). When it was dry she painted it. We used pearlised paint which gives a lovely shiny finish.


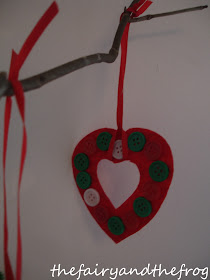
The last one needed a bit more adult help as we used big scissors. The Fairy selected buttons. I helped her to arrange them in a heart pattern on some felt (we used sticky buttons so they were easy to attach). I then cut the heart out and attached the ribbon.


Obviously we hadn't used enough sparkle as when I was out of the room putting the Frog to bed, The Fairy added a few more pipe cleaners. 'Its finished now mummy! she announced as I walked back into the room.


Language Links:
Vocabulary: heart, paint, twist, shiny, sparkle
Other skills: matching (buttons)

On the run up to Christmas I'm joining in with a group of fabulous kids bloggers to get into the Christmas spirit. Why don't you check out some of their ideas or link your ideas to the blog hop below.

Jennifer's Little World - http://www.jenniferslittleworld.com
Mummy..Mummy..MUM!! - http://www.mummymummymum.com
Life At The Zoo - http://www.lifeatthezoo.com


Tuesday, 13 November 2012

Craft with babyfood jars

Whenever I look at a baby food jar I think 'I could make something out of that'. I think it's the miniature appeal that makes them cute. Check out this collection of ideas for using baby food jars.


Want to teach kids about being thankful, how about this gratitude turkey from Toddler Approved.


When I saw this post by The Imagination Tree about how to make a glass lantern, I knew instantly that we should use one of many baby food jars in our craft cupboard to make a mini version.


Feeling Christmasy, check out these very friendly snow men from Inspired by Family.


Red Ted Art used baby food jars to make some very easy snow globes.

These lanterns also by Inspired by Family would make a great table centre piece.


Or how about some salt art?


Been visited from outer space - Train up a child used baby food jars to make these glow in the dark aliens.


We also love to use jars for sorting and storing.


Do you upcycle jars? What do you do?


Wednesday, 7 November 2012

Crafting NatWest Pigs

Remember the Natwest piggy banks? Well in order to encourage saving NatWest are relaunching the famous piggy banks. They are running a competition to design a new one. Let your budding artists get creative as they create a new piggy. Check out what we did.


Cutting air dry clay


Cutting ears(from felt)

Sorting pink sparkly bits (you can never have too many pink sparkly bits you realize!)

Painting the clay


Drum roll..... the finished pig.

If you want to take part hop over to natwest.com/pigsbykids to join in. 

The following rules apply to the competition.
  • The competition is open to children up to 13 years old.
  • The winning design will become the NatWest pig.
  • The closing date for entries is 12pm on 11th November.
  • Terms and conditions apply- see website for details (natwest.com/pigsbykids)

This is an advertising promotion for NatWest

Monday, 5 November 2012

6 ways to use Dear Zoo to develop speech and language skills

You may remember in the summer we attended the 30th birthday party of the book Dear Zoo.  It's a book I love and use frequently in my job as a speech and language therapist. So I thought I'd share how I use it to develop speech, language and communication skills. If you don't already have a copy of Dear Zoo and want to buy one you can find it on Amazon by clicking on this link Dear Zoo (this is an affiliate link which means I get a small commission if you end up buying the book at no extra cost to you).


1) Reading reading reading...
Loads of research points towards how important reading books is - it's never to early (or too late) to start to share books with your child. You don't need to do anything special, just to read. 

Loads of libraries have free activities for kids (ours even has coffee for the parents too - total bonus!) so you can borrow books and have an afternoons entertainment thrown in (and they don't mind if your child uses the books as a teething toy).

2) Reading the book 'where the child is at'. 
Don't get me wrong, I love the words in their original format (especially as they include a repeated phrase- great for developing language).  However some children benefit from a 'less is more' approach when learning to talk. Cutting extra words helps them focus on learning new vocabulary. When reading I try and match my language level to theirs.

For children who are just starting out with words I tend to use just the animal names as I read... 'elephant...giraffe etc.'

For children at the combining words stage I model at their level, sometimes adding an extra word e.g.

'bye bye elephant...too heavy...what's next?...hello giraffe... too tall... bye giraffe... what's next?...'


3) To develop listening and attention skills.
This game is great for engaging children with shorter attention spans. Give each child a toy animal that features in the book (e.g. one an elephant, one a giraffe etc). They have to listen carefully for their animal and hold it up when they hear it's name being read out.

4) To develop phonological awareness skills.
For older kids I like to develop speech sound awareness (phonological awareness) by playing games with the names of the animals. I have all the animals in a bag or box and they take turns to take one. Depending on what skill we are working on we work out 'How many bits (syllables) has it got' or 'What sound does it start with?' As an extension activity we sometimes see if we can think of anything else that starts with that sound.


4) To develop reasoning skills.
Again for older children I like to ask (after reading the book) 'Which is their favourite animal and why?', 'Do they think it would make a good pet?' I also like to ask 'What was their best present and who sent it?'. As 'wh' questions are abstract they can be harder to learn and can benefit from more practice.

6) To develop categorisation skills.
Having good categorisation skills helps you to remember and retrieve new vocabulary. The animals in Dear Zoo are all Zoo animals (apart from the puppy of course). The book provides a good basis for talking about different types of animals - wild/ pet/farm, animals that live on land/ water, animals that live in hot countries /cold countries. This activity works well if you have two defined areas (e.g. hoops or circles made form wool) and talk through the two groups first  and then give the children turns to select and animal and say where it belongs. For older children you can use a world map and get them to place the animals where they live.


Thursday, 1 November 2012

Salt dough advent calender


One of the things I love about the kids getting older is being able to do things with them I enjoyed as a kid (fortunately so far they seem to enjoy them too!) Salt dough featured highly in our childhood so it's not surprising that when thinking about how I could make an advent calender salt dough sprung to mind.

advent calender

I made the dough with The Fairy (you just add the ingredients then mix).

how to make salt dough

We then cut out the numbers/ stars, great counting practice.

homemade advent calender

You need to cook salt dough on a very low temp (gas mark 1/4) - the idea is to dry the shapes out, not bake them. Some people recommend to leave the shapes to air dry for a couple of days - I've never had very much luck with that and always end up finishing them in the oven (perhaps because I always make thick shapes or possibly as I'm not always very patient). Once dry you can then paint.

homemade advent calender

You maybe wondering why there is a dolls house at the start of this post, well the Fairy is totally in love with her dolls house - assembled and painted for her recent birthday by my lovely Dad (Thanks Dad!) The house inspired the purple and silver colour scheme we used to decorate the finished stars.

So the plan is each night of advent for myself or The Papa to hide a star in the dolls house. In the morning The Fairy can hunt for it and we can add it to our advent string.Where's the star hiding today?


This is a blog hop - check out the other blog hop co hosts to see what they have created.

Rainy Day Mum ~ Mummy Mummy Mum! ~ Life at the Zoo ~ Here Come the Girls
Do you have an Advent post? Link up your ideas below,